
 English
 Polski
 Deutsch
 Nederlands
Fixing Orca Slicer Timelapse Issues on the Centauri Carbon Printer
If you’ve recently started using Orca Slicer with your Centauri Carbon 3D printer and tried enabling timelapse recording, you may have noticed something frustrating: the print file won’t save correctly, and the timelapse feature doesn’t actually work. You slice your file, check the timelapse box, and expect smooth recordings of your prints—but instead, nothing happens.
This problem is surprisingly common, but the good news is that there’s a simple fix. By making a couple of small changes to your printer profile in Orca Slicer, you can restore both proper file saving and timelapse recording functionality. Let’s break down the issue and the solution step by step.
Why the Timelapse Fails
When you enable timelapse recording, the slicer and the printer firmware need to communicate details about the print layers. Without this information, the slicer can’t properly track layer progress, which is crucial for triggering the camera at the right moments.
On the Centauri Carbon, this communication is missing by default in Orca Slicer’s configuration. As a result:
- The print file is not saved properly.
- Layer changes are not tracked, so the timelapse function doesn’t know when to take snapshots.
Fortunately, you don’t need to install extra plugins or update firmware to fix this. All it takes is a quick modification to your printer profile’s G-code settings.
The Solution – Editing Machine Start and Layer Change G-code
Here’s how you can fix the issue once and for all:
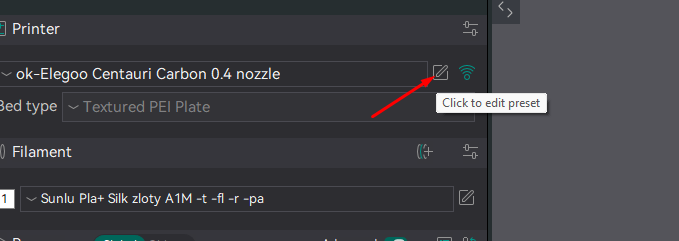
1.Open Orca Slicer.
2. Go to your printer profile settings for the Centauri Carbon.
3. Scroll down to the Machine Start G-code section. At the very bottom of this block, add the following line:
SET_PRINT_STATS_INFO TOTAL_LAYER=[total_layer_count]
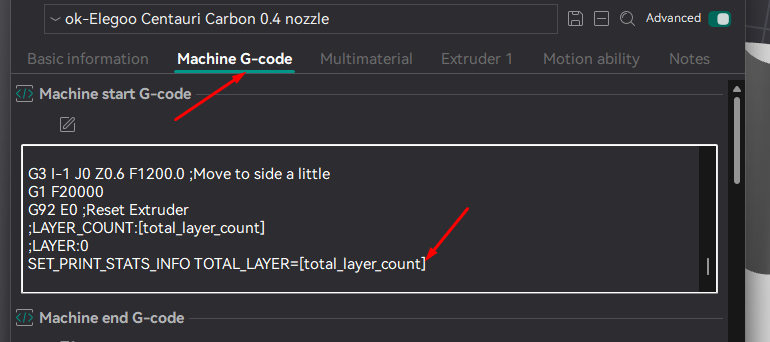
This tells the printer how many layers will be printed in total. That way, the slicer and printer stay in sync from the very beginning.
4. Next, find the Layer Change G-code section. Add this line:
SET_PRINT_STATS_INFO CURRENT_LAYER={layer_num + 1}
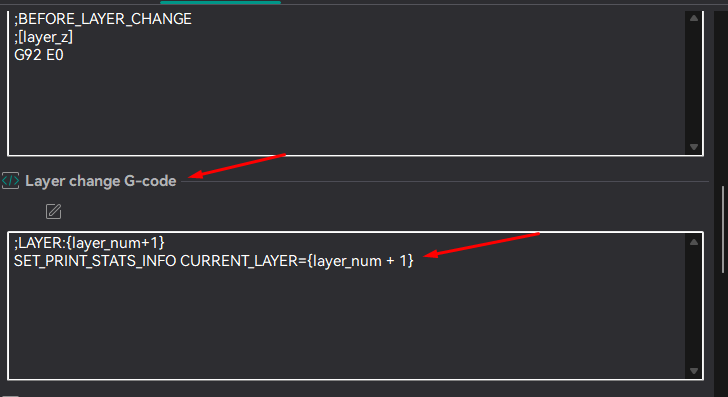
This instructs the slicer to update the printer every time a new layer begins. Each time it changes, Orca Slicer can now trigger the timelapse snapshot correctly.
Why This Fix Works
By adding these two lines, you’re essentially giving Orca Slicer the missing instructions it needs to track your prints. The slicer now:
- Knows the total number of layers before the print begins.
- Updates the current layer number every time it changes.
- Allows timelapse recording to function properly, since snapshots are tied to layer transitions.
This also resolves the issue of the file not saving correctly, because the slicer can now properly embed layer-tracking metadata into the print file.
Conclusion
If you’ve been struggling with timelapse recording on your Centauri Carbon using Orca Slicer, don’t give up. The solution is straightforward: just edit your printer profile and add the two lines of G-code above.
Once done, you’ll enjoy smooth, reliable timelapse videos of your 3D prints—perfect for sharing your creations online or simply keeping a visual record of your work. Best of all, it only takes a few minutes to implement.
Try this fix on your next print, and watch your Centauri Carbon timelapse recordings finally come to life.